Complete Guide To Amazon S3
Simple Storage Service (S3) has become the backbone of how millions of applications handle data. And if you’re working with data analytics? You’re going to want to know this inside and out.
Let me walk you through everything you need to know about S3, from the absolute basics to connecting it with LiveDocs for some serious data analytics magic.
![]()
What Exactly Is Amazon S3?
 Livedocs just launched a new feature: Agent-mode data analysis 🎉 Instead of writing code or manually building charts, you can now ask LiveDocs to analyze your data for you, generate insights, and save charts automatically.
Here’s the thing: S3 isn’t just a hard drive in the cloud. It’s an object storage service that lets you store and retrieve any amount of data from anywhere on the web. Think of it as an infinitely expandable filing cabinet that you can access from anywhere, anytime.
Unlike traditional file systems where you navigate through folders and subfolders, S3 uses a flat structure with buckets and objects. Each object (your file) gets a unique identifier, and you can retrieve it using a simple HTTP request.
The beauty of S3? It’s ridiculously scalable. Whether you’re storing a few gigabytes or petabytes of data, S3 handles it the same way. Plus, you only pay for what you use, no need to guess how much storage you’ll need six months from now.
Getting Started: Creating Your First S3 Bucket
Let’s get our hands dirty. First things first, you need an AWS account. If you don’t have one yet, head over to aws.amazon.com and sign up. They even offer a free tier that includes 5GB of S3 storage for a year, which is perfect for learning.
Step-by-Step Bucket Creation
Once you’re logged into the AWS Console, search for S3 in the services menu. You know what? The interface might seem overwhelming at first, but trust me, it’s more intuitive than it looks.
Click the “Create bucket” button. You’ll need to make a few decisions:
Bucket name:
This needs to be globally unique across all of AWS. I usually go with something like mycompany-analytics-data-2026. Cannot use spaces or uppercase letters here, AWS is particular about that.
Region:
Choose the region closest to where most of your users are. If you’re in California and your users are in California, pick us-west-1. Latency matters, especially when you’re pulling data for analytics.
Block Public Access settings:
Unless you’re specifically hosting a public website, keep these all checked. You don’t want your data accidentally exposed to the internet. I’ve seen too many horror stories about misconfigured S3 buckets.
Hit create, and boom, you’ve got your first bucket.
Understanding S3 Storage Classes
Not all data is created equal. Some files you need instantly; others you might access once a year. S3 gets this, which is why they offer different storage classes.
S3 Standard
This your go-to for frequently accessed data. It’s fast, reliable, and perfect for active datasets you’re constantly analyzing.
S3 Intelligent-Tiering
This automatically moves data between access tiers based on usage patterns. Honestly, this is a game-changer if you’re not sure how often you’ll access certain files.
S3 Glacier
This is for archival storage, think compliance documents or old logs you need to keep but rarely touch. It’s cheap but takes hours to retrieve.
For data analytics work, you’ll typically stick with Standard or Intelligent-Tiering. You need that data accessible when your analytics pipeline calls for it.
Uploading and Managing Objects
Let me show you how to actually get data into S3. There are several ways to do this, and each has its place.
Through the AWS Console
The simplest method? Just drag and drop. Navigate to your bucket, click “Upload,” and drag your files in. Great for one-off uploads or when you’re just testing things out.
But here’s where it gets interesting: you can also set metadata on each object. This includes content type, cache control, and custom metadata. For analytics, custom metadata can be incredibly useful for organizing and categorizing your datasets.
Using the AWS CLI
For anything serious, you’ll want the command line interface. It’s faster and scriptable. First, install the AWS CLI and configure it with your credentials:
aws configure
Then uploading is as simple as:
aws s3 cp myfile.csv s3://mycompany-analytics-data-2026/raw-data/
Want to upload an entire directory? Add the --recursive flag:
aws s3 cp ./data-folder s3://mycompany-analytics-data-2026/datasets/ --recursive
Using the SDK (Python Example)
When you’re building applications or automated pipelines, you’ll work with the SDK. Here’s a quick Python example using boto3:
import boto3

# Create an S3 client
s3 = boto3.client('s3')

# Upload a file
s3.upload_file('local_file.csv', 'mycompany-analytics-data-2026', 'data/local_file.csv')

# Download a file
s3.download_file('mycompany-analytics-data-2026', 'data/remote_file.csv', 'downloaded_file.csv')

# List objects in a bucket
response = s3.list_objects_v2(Bucket='mycompany-analytics-data-2026')
for obj in response['Contents']:
    print(obj['Key'])
You know what’s cool? You can do everything programmatically, upload, download, delete, even set permissions. This becomes essential when you’re processing thousands of files.
S3 Security and Permissions
Security isn’t optional; it’s mandatory. S3 offers multiple layers of security, and you should use all of them.
Bucket Policies define who can access your bucket and what they can do. Here’s a simple policy that allows read access to a specific IAM user:
{
  "Version": "2012-10-17",
  "Statement": [
    {
      "Effect": "Allow",
      "Principal": {
        "AWS": "arn:aws:iam::123456789012:user/analytics-user"
      },
      "Action": "s3:GetObject",
      "Resource": "arn:aws:s3:::mycompany-analytics-data-2026/*"
    }
  ]
}
IAM roles are even better for applications. Instead of embedding credentials in your code (please don’t do that), your application assumes a role with specific permissions.
Encryption should be enabled by default. S3 offers server-side encryption using AWS-managed keys (SSE-S3) or your own keys (SSE-KMS). For most analytics work, SSE-S3 is perfectly fine and comes at no extra cost.
Organizing Your Data for Analytics
Here’s something I learned the hard way: organization matters tremendously in S3. Unlike a traditional file system, S3 doesn’t actually have folders, those are just prefixes in object keys. But you should still organize logically.
A common pattern I use for analytics data:
s3://bucket-name/
  raw-data/
    year=2026/
      month=01/
        day=15/
          data.csv
  processed-data/
    year=2026/
      month=01/
        aggregated.parquet
  reports/
    monthly/
      2026-01-report.pdf
This partitioning scheme (year/month/day) makes it super efficient to query specific date ranges. Tools like Amazon Athena and Spark can skip entire partitions they don’t need, dramatically speeding up queries.
Advanced Features You Should Know
S3 Versioning
Thiskeeps multiple versions of an object. Accidentally overwrite an important dataset? No problem, you can retrieve the previous version. Enable it on your bucket settings.
S3 Lifecycle Policies
This automatically transition objects between storage classes or delete them after a certain time. For example, move files to Glacier after 90 days:
{
  "Rules": [
    {
      "Id": "Archive old data",
      "Status": "Enabled",
      "Transitions": [
        {
          "Days": 90,
          "StorageClass": "GLACIER"
        }
      ]
    }
  ]
}
S3 Event Notifications
This can trigger Lambda functions when objects are uploaded. This is perfect for automated data processing pipelines, upload a file, and your processing automatically kicks off.
Connecting S3 with Livedocs for Data Analytics
Now we’re getting to the good stuff. Livedocs is a powerful analytics platform, and when you connect it with S3, you create a seamless data pipeline.
Livedocs just launched a new feature: Agent-mode data analysis 🎉 Instead of writing code or manually building charts, you can now ask LiveDocs to analyze your data for you, generate insights, and save charts automatically.
Why Connect S3 with Livedocs?
S3 is fantastic for storing massive amounts of data cheaply. Livedocs excels at analyzing and visualizing that data. Together? They’re unstoppable.
Instead of manually downloading files from S3, processing them locally, then uploading to Livedocs, you establish a direct connection. Livedocs queries your data directly in S3, keeping everything centralized and up-to-date.
Setting Up the Connection
First, you need to give Livedocs permission to access your S3 bucket. Create an IAM role specifically for Livedocs with read access to your analytics bucket.
Creating IAM Credentials for LiveDocs Access
Before we connect Livedocs to S3, we need to set up proper authentication. This is where Access Keys come in, and getting this right is crucial for both security and functionality.
Creating an IAM User for LiveDocs
Head over to the IAM console in AWS. You want to create a dedicated user just for Livedocs, never use your root account credentials for this.
Click “Users” in the sidebar, then “Add users.” Give it a meaningful name like livedocs-analytics-user.
For access type, select “Programmatic access.” This generates the Access Key ID and Secret Access Key we need.
Setting Proper Permissions
Now here’s where people often mess up. You need to attach a policy that gives this user permission to access your S3 bucket. Click “Attach existing policies directly” and then “Create policy.”
Switch to the JSON tab and use this policy (replace mycompany-analytics-data-2026 with your actual bucket name):
{
  "Version": "2012-10-17",
  "Statement": [
    {
      "Effect": "Allow",
      "Action": [
        "s3:GetObject",
        "s3:ListBucket",
        "s3:GetBucketLocation"
      ],
      "Resource": [
        "arn:aws:s3:::mycompany-analytics-data-2026",
        "arn:aws:s3:::mycompany-analytics-data-2026/*"
      ]
    }
  ]
}
This policy gives Livedocs read access to list objects and download them, but doesn’t allow deletion or modification. That’s exactly what you want for analytics work, read-only access keeps your source data safe.
Saving Your Credentials
After creating the user, AWS will show you the Access Key ID and Secret Access Key. This is the only time you’ll see the Secret Access Key, so download the CSV file or copy both values somewhere secure immediately.
These credentials are what Livedocs will use to authenticate with S3. Treat them like passwords, never commit them to version control, never share them in Slack, and rotate them periodically for security.
Understanding S3 Endpoints and Path Styles
Before we jump into the Livedocs configuration, let’s talk about endpoints and path styles. This sounds technical, but it’s actually straightforward.
What’s an S3 Endpoint?
An endpoint is the URL that applications use to communicate with S3. The standard format is:
https://s3.{region}.amazonaws.com
For example, if your bucket is in us-east-1, the endpoint would be:
https://s3.us-east-1.amazonaws.com
If you’re using the older US East (N. Virginia) region without specifying a region, it might just be:
https://s3.amazonaws.com
Virtual-Hosted Style vs. Path Style
S3 supports two URL formats for accessing objects, and this is where “Force path style” comes in.
Virtual-hosted style (the default and recommended):
https://bucket-name.s3.region.amazonaws.com/object-key
Path style (older, being phased out):
https://s3.region.amazonaws.com/bucket-name/object-key
Most of the time, you’ll leave “Force path style” unchecked (set to false). You only need to enable it if you’re working with older buckets that have dots in their names or if you’re connecting to S3-compatible storage that doesn’t support virtual-hosted style.
For Livedocs and standard S3 buckets, keep this set to false.
Organizing Your Data with Prefixes
Let me explain prefixes because they’re going to be important when you configure Livedocs. Remember how I said S3 doesn’t actually have folders? Well, prefixes are how we simulate that folder structure.
A prefix is just the leading part of an object key. If you have an object stored as:
raw-data/sales/2026/january/sales-data.csv
Then raw-data/sales/2026/january/ is the prefix.
Why Prefixes Matter for Livedocs
When you connect Livedocs to S3, you can specify a prefix to limit which data Livedocs can see. This is super useful for organizing different datasets or restricting access to specific folders.
For example, if you have this structure:
s3://mycompany-analytics-data-2026/
  raw-data/
    sales/
    inventory/
    customer-data/
  processed-data/
    reports/
  internal-only/
    sensitive-files/
You might connect Livedocs with the prefix raw-data/sales/ so it only accesses sales data. This keeps things organized and adds an extra layer of access control.
A common pattern I use for analytics data:
s3://bucket-name/
  raw-data/
    year=2026/
      month=01/
        day=15/
          data.csv
  processed-data/
    year=2026/
      month=01/
        aggregated.parquet
  reports/
    monthly/
      2026-01-report.pdf
This partitioning scheme (year/month/day) makes it super efficient to query specific date ranges. Livedocs and tools like Amazon Athena can skip entire partitions they don’t need, dramatically speeding up queries.
Connecting S3 to Livedocs: The Complete Configuration
Alright, now we’re ready to connect everything. You’ve got your bucket, your data is organized, and you have your IAM credentials. Let’s configure Livedocs.
Gathering Your Information
Before you start the configuration process, make sure you have these details ready:
Bucket name: mycompany-analytics-data-2026 (your actual bucket name)
Region code: us-east-1 (whatever region you chose when creating the bucket)
Access Key ID: Looks something like AKIAIOSFODNN7EXAMPLE
Secret Access Key: A longer string like wJalrXUtnFEMI/K7MDENG/bPxRfiCYEXAMPLEKEY
Endpoint: Based on your region, typically https://s3.{region}.amazonaws.com
Prefix (optional): Something like raw-data/sales/ if you want to limit access
Step-by-Step Livedocs Configuration
Log into your Livedocs account and navigate to the data sources or connections section. Search for “S3”, fill in the form and click “Connect to S3.”
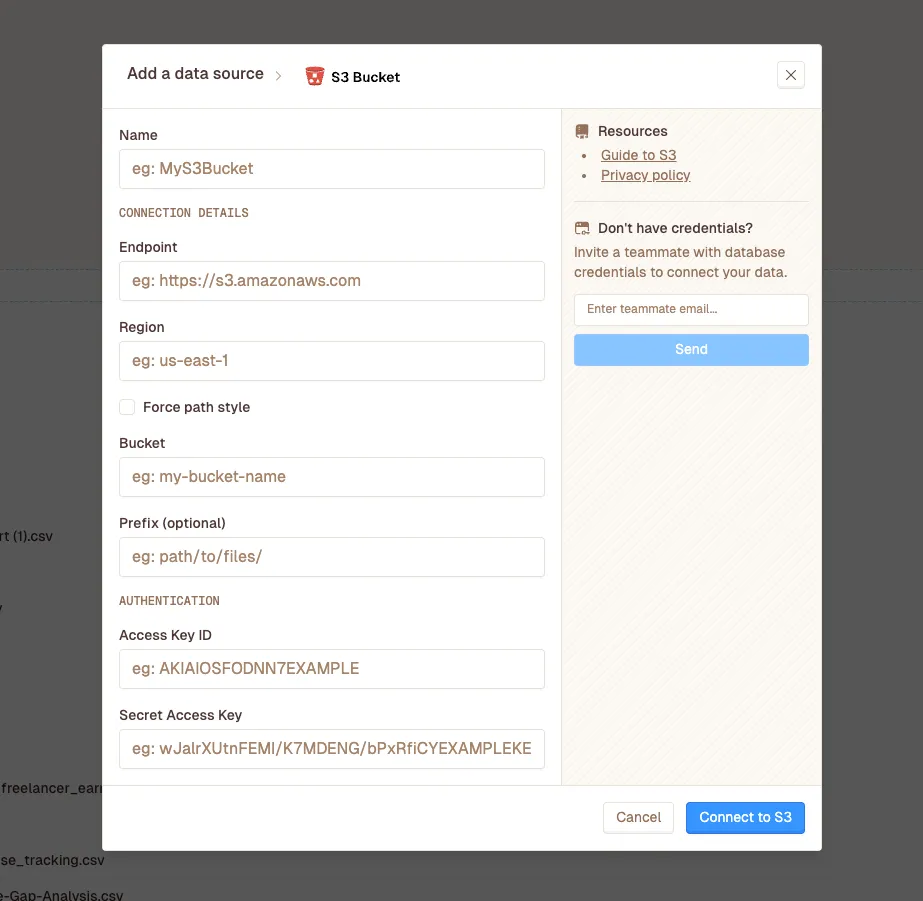
Click to add a new S3 connection. You’ll see a form with several fields. Let me walk you through each one:
1. Name
Give your connection a descriptive name. This is just for your reference within Livedocs, so make it meaningful. Something like “Production Sales Data S3” or “Analytics Warehouse” works well.
2. Connection Details - Endpoint
Here’s where you enter your S3 endpoint. For standard AWS S3, use:
https://s3.{your-region}.amazonaws.com
For example:
- US East (N. Virginia):
https://s3.us-east-1.amazonaws.com - US West (Oregon):
https://s3.us-west-2.amazonaws.com - EU (Ireland):
https://s3.eu-west-1.amazonaws.com - Asia Pacific (Sydney):
https://s3.ap-southeast-2.amazonaws.com
Some Livedocs implementations might just ask for the region and construct the endpoint automatically, but if you need to enter it manually, use the format above.
3. Connection Details - Region
Enter your AWS region code. This is the same region where you created your bucket. Common values:
us-east-1(US East - N. Virginia)us-west-2(US West - Oregon)eu-west-1(Europe - Ireland)ap-southeast-2(Asia Pacific - Sydney)
You can always check your bucket’s region by looking at its properties in the S3 console.
4. Connection Details - Force Path Style
For standard AWS S3 buckets, set this to false (or leave it unchecked). You only need to enable this if:
- Your bucket name contains dots (like
my.company.data) - You’re connecting to S3-compatible storage (like MinIO)
- Livedocs specifically tells you to enable it for troubleshooting
In 99% of cases, you’ll leave this disabled.
5. Connection Details - Bucket
Enter your bucket name exactly as it appears in S3. Just the name, nothing else. For example:
mycompany-analytics-data-2026
Don’t include s3:// or any slashes. Just the bucket name.
6. Connection Details - Prefix (Optional)
If you want to limit Livedocs to a specific “folder” within your bucket, enter the prefix here. Always end it with a forward slash.
Examples:
raw-data/sales/(access only the sales data)datasets/2026/(access only 2026 datasets)- Leave blank to access the entire bucket
Remember, prefixes are case-sensitive, so Raw-Data/ is different from raw-data/.
7. Authentication - Access Key ID
Paste the Access Key ID you saved when creating the IAM user. It looks something like:
AKIAIOSFODNN7EXAMPLE
8. Authentication - Secret Access Key
Paste the Secret Access Key. This is the longer credential that looks like:
wJalrXUtnFEMI/K7MDENG/bPxRfiCYEXAMPLEKEY
Testing the Connection
After filling in all the fields, click “Connect to S3” button. Click it. This sends a test request to S3 to verify:
- The endpoint is reachable
- The credentials are valid
- The bucket exists and is accessible
- The prefix (if specified) exists
If the test fails, you’ll usually get an error message. Let me help you troubleshoot the common ones:
“Access Denied”: Your IAM user doesn’t have the right permissions. Go back and check the policy attached to the user.
“Bucket does not exist”: You’ve typed the bucket name incorrectly, or you’re pointing to the wrong region.
“Invalid credentials”: Double-check your Access Key ID and Secret Access Key. Make sure there are no extra spaces.
“Connection timeout”: Verify your endpoint URL is correct for your region.
Once the test succeeds, hit “Save” or “Create Connection.” Congratulations, Livedocs is now connected to your S3 bucket!
The Future of S3 and Analytics
Amazon keeps adding features to S3. S3 Object Lambda lets you transform data on-the-fly as it’s retrieved, imagine converting JSON to CSV automatically without storing both formats. S3 Access Points simplify managing access to shared datasets. S3 Select and Glacier Select let you query subsets of data without retrieving entire objects.
The trend is clear: S3 is becoming more than just storage; it’s evolving into an analytics platform in its own right.
Final Thoughts
You’ve now got the foundation to work effectively with S3 and connect it with Livedocs for powerful data analytics. Start small, create a bucket, upload some test data, connect it to Livedocs, and build a simple visualization.
The learning curve might seem steep initially, but honestly? Once you get the hang of it, S3 becomes second nature. And the combination of S3’s scalability with Livedocs’ analytical power opens up possibilities that simply weren’t feasible with traditional approaches.
Remember, the key is to start experimenting. Break things, fix them, and learn from the process. That’s how everyone who’s now an S3 expert got there, myself included.
The best, fastest agentic notebook 2026? Livedocs.
- 8x speed response
- Ask agent to find datasets for you
- Set system rules for agent
- Collaborate
- And more
Get started with Livedocs and build your first live notebook in minutes.
- 💬 If you have questions or feedback, please email directly at a[at]livedocs[dot]com
- 📣 Take Livedocs for a spin over at livedocs.com/start. Livedocs has a great free plan, with $10 per month of LLM usage on every plan
- 🤝 Say hello to the team on X and LinkedIn
Stay tuned for the next article!
Ready to analyze your data?
Upload your CSV, spreadsheet, or connect to a database. Get charts, metrics, and clear explanations in minutes.
No signup required — start analyzing instantly